Every single application that running in the background or the foreground of Windows 10 PC will be distributed with specific time from the CPU. The number of application it has to deal with at the same time, the less time it assigns to each app. The time is evenly allocated among all the apps, but the chances are that some higher priority apps get longer time leaving other apps no choice to share a very less time. It is expected that the application that manages to get maximum time from the CPU will run faster in comparison to the one with low priority apps.
How to Set CPU Priority to Prefer Foreground Apps in Windows 10
Due to this reason, there are lots of users who want to set CPU Priority to Prefer Foreground Apps so that they can make then run faster. Here in this post, you will read about two possible ways on how to do that. So without further delay why don’t you start reading about them:
Set CPU Priority to Prefer Foreground Apps using Control Panel
In the Start menu search bar type Control Panel and when the same desktop app appears in the search results click to open it.
Here in this window of Control panel, you need to click on the System,
And then click on the link which reads “Advanced system settings” available on the top left side of System window.
This will launch the “System Properties window”. 3. In the System Properties window, you need to click on the Settings button listed under Performance section.
This will launch Performance option window. Here you need to switch to Advanced tab. 4. After that navigate to option which reads “Adjust the best performance for:” Here make sure the Program is selected instead of Background services.
Note: By default, Program is selected already. In this situation, there is no need to make any changes as the system is already optimized for prefer apps. 5. After that click on Apply and then OK to finish.
Set CPU Priority to Prefer Foreground Apps using Registry Editor
- In the Start menu search bar type “regedit” and when run command appears in the search result click to open it.
When UAC dialogue box appears, click Yes to continue. This will launch the Registry Editor. 2. Here in the Registry Editor address bar, you need to copy and paste following address to reach the particular registry quickly.
In case, Registry Editor address bar is missing, then navigate to the following registry manually.
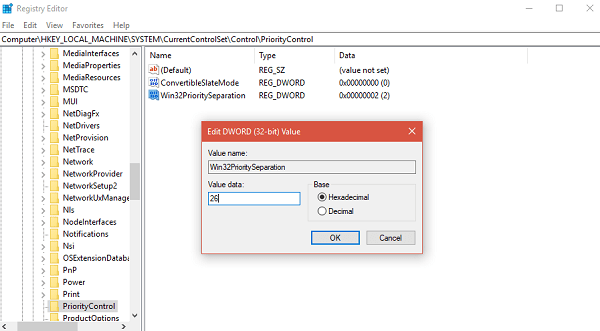
- Here on the right pane of the PriorityControl key, you will find out DWORD (32-bit) value named as Win32PrioritySeparation. You just need to change its value to change CPU Priority to Prefer Foreground Apps
For that, double-click on Win32PrioritySeparation DWORD value and you will find out that by default it has value data 2. Now if you want to adjust the best performance for foreground apps in Windows 10, then set its value data to 26.
Click OK. In case, you just want to adjust the performance of background process or services of Windows 10, then set its value data to 18.
Click OK. That’s it. So above are the two ways on how to set CPU priority to prefer foreground apps to Windows 10. Depending on the requirement you can take help of these methods to change CPU priority in between foreground and background apps. In case, you have any query or suggestion related to this tutorial drop it in the comment section.


